(Added Hacker description, removed unreleased status, added cooldown note.) |
No edit summary |
||
| (12 intermediate revisions by 10 users not shown) | |||
| Line 3: | Line 3: | ||
==Overview== |
==Overview== |
||
| − | Replacing passive tier bonuses, the Perk Decks system allows players to pick from |
+ | Replacing passive tier bonuses, the Perk Decks system allows players to pick from twenty-one different "decks", each with nine perks (though the skills at second, fourth, sixth, and eighth rank are shared between all current decks). Only one perk deck can be active at a time. |
Presently, Perk Decks are '''not''' reset when going [[Infamy|Infamous]]. |
Presently, Perk Decks are '''not''' reset when going [[Infamy|Infamous]]. |
||
| − | Unlike skill trees which cannot be fully unlocked because of the limited number of skill points obtainable in-game, Perk trees rely on the player's XP income, converted into Perk Points, which is limitless, thus allowing one to eventually unlock/complete all twenty decks. This is offset by the fact that the player may only have one active perk deck at a time. |
+ | Unlike skill trees which cannot be fully unlocked because of the limited number of skill points obtainable in-game, Perk trees rely on the player's XP income, converted into Perk Points, which is limitless, thus allowing one to eventually unlock/complete all twenty-one decks. This is offset by the fact that the player may only have one active perk deck at a time. |
| − | It costs a total of 13,700 Perk Points to fully unlock all 9 cards in a single deck, and |
+ | It costs a total of 13,700 Perk Points to fully unlock all 9 cards in a single deck, and 287,700 Points to unlock all 21 decks. |
| Line 34: | Line 34: | ||
==Available Perk Decks== |
==Available Perk Decks== |
||
| − | There are twenty decks in the game, with each one made up of four mutual perks, and five unique ones. |
+ | There are twenty-one decks in the game, with each one made up of four mutual perks, and five unique ones. |
===Mutual Perks=== |
===Mutual Perks=== |
||
These are the perks found on each and every perk deck. The number in parentheses (e.g. ''(200)'') beneath the tier number indicates how many perk points must be spent on that tier's skill to unlock it. |
These are the perks found on each and every perk deck. The number in parentheses (e.g. ''(200)'') beneath the tier number indicates how many perk points must be spent on that tier's skill to unlock it. |
||
| Line 76: | Line 76: | ||
|- style="background-color:hsla(200, 100%, 50%, 0.15)" align="center" valign="top" |
|- style="background-color:hsla(200, 100%, 50%, 0.15)" align="center" valign="top" |
||
| [[File:Brute Strength.png|50px]]<br>'''Brute Strength'''<br />You grant {{color|positive|8%}} damage reduction for players in your group. This bonus is doubled for you when you are under {{color|value|50%}} health. |
| [[File:Brute Strength.png|50px]]<br>'''Brute Strength'''<br />You grant {{color|positive|8%}} damage reduction for players in your group. This bonus is doubled for you when you are under {{color|value|50%}} health. |
||
| − | | [[File:Marathon Man.png|50px]]<br>'''Marathon Man'''<br />You and your crew's stamina is increased by {{color|positive|50%}}.<br />Increases your shout distance by {{color|positive|25%}}.<br />When you are within medium range of an enemy, you recieve {{color|positive|6%}} less damage from enemies.< |
+ | | [[File:Marathon Man.png|50px]]<br>'''Marathon Man'''<br />You and your crew's stamina is increased by {{color|positive|50%}}.<ref name="note">Crew perk bonuses do not stack.</ref><br />Increases your shout distance by {{color|positive|25%}}.<br />When you are within medium range of an enemy, you recieve {{color|positive|6%}} less damage from enemies.<br/>''{{color|negative|Note: The damage reduction requires the [[Underdog]] skill to function.}}'' |
| [[File:Wolf Pack.png|50px]]<br>'''Wolf Pack'''<br />Your crew will gain {{color|positive|10%}} more health. |
| [[File:Wolf Pack.png|50px]]<br>'''Wolf Pack'''<br />Your crew will gain {{color|positive|10%}} more health. |
||
You will gain {{color|positive|20%}} more health.<ref name="note" /> |
You will gain {{color|positive|20%}} more health.<ref name="note" /> |
||
| Line 226: | Line 226: | ||
! colspan="5" style="background-color:hsla(200, 100%, 50%, 0.5)" align="center" | '''Infiltrator''' |
! colspan="5" style="background-color:hsla(200, 100%, 50%, 0.5)" align="center" | '''Infiltrator''' |
||
|- style="background-color:hsla(200, 100%, 50%, 0.15)" align="center" valign="top" |
|- style="background-color:hsla(200, 100%, 50%, 0.15)" align="center" valign="top" |
||
| − | | [[File:OVERDOG.png|50px]]<br>'''OVERDOG'''<br />When you are surrounded by three enemies or more, you receive {{color|positive|12%}} less damage from enemies.<br />Your second and each consecutive melee hit within {{color|value| |
+ | | [[File:OVERDOG.png|50px]]<br>'''OVERDOG'''<br />When you are surrounded by three enemies or more, you receive {{color|positive|12%}} less damage from enemies.<br />Your second and each consecutive melee hit within {{color|value|1}} second of the last one will deal {{color|value|10}} times its normal damage.<br/>''{{color|negative|Note: Despite saying 1 second, it actually lasts 7 seconds. However, missing a melee strike resets the buff. The buff can be activated on team AI and civilians.}} |
| [[File:Basic Close Combat.png|50px]]<br>'''Basic Close Combat'''<br />When you are within medium range of an enemy, you receive {{color|positive|8%}} less damage from enemies. |
| [[File:Basic Close Combat.png|50px]]<br>'''Basic Close Combat'''<br />When you are within medium range of an enemy, you receive {{color|positive|8%}} less damage from enemies. |
||
| [[File:Advanced Close Combat.png|50px]]<br>'''Advanced Close Combat'''<br />When you are within medium range of an enemy, you receive an additional {{color|positive|8%}} less damage from enemies. |
| [[File:Advanced Close Combat.png|50px]]<br>'''Advanced Close Combat'''<br />When you are within medium range of an enemy, you receive an additional {{color|positive|8%}} less damage from enemies. |
||
| Line 312: | Line 312: | ||
! colspan="5" style="background-color:hsla(200, 100%, 50%, 0.5)" align="center" | '''Yakuza''' |
! colspan="5" style="background-color:hsla(200, 100%, 50%, 0.5)" align="center" | '''Yakuza''' |
||
|- style="background-color:hsla(200, 100%, 50%, 0.15)" align="center" valign="top" |
|- style="background-color:hsla(200, 100%, 50%, 0.15)" align="center" valign="top" |
||
| − | | [[File:Koi Irezumi.png|50px]]<br>'''Koi Irezumi'''<br />The lower your health, the more armor recovery rate you have. When your health is below {{color|value| |
+ | | [[File:Koi Irezumi.png|50px]]<br>'''Koi Irezumi'''<br />The lower your health, the more armor recovery rate you have. When your health is below {{color|value|25%}}, you will gain up to {{color|positive|20%}} armor recovery rate.<br />{{color|event|Entering this state negates regeneration effects.}} Bonuses scale linearly with health. |
| − | | [[File:Hebi Irezumi.png|50px]]<br>'''Hebi Irezumi'''<br />The lower your health, the more movement speed you gain. When your health is below {{color|value| |
+ | | [[File:Hebi Irezumi.png|50px]]<br>'''Hebi Irezumi'''<br />The lower your health, the more movement speed you gain. When your health is below {{color|value|25%}}, you will gain up to {{color|positive|20%}} movement speed. |
| − | | [[File:Tora Irezumii.png|50px]]<br>'''Tora Irezumi'''<br />The lower your health, the more armor recovery rate you have. When your health is below {{color|value| |
+ | | [[File:Tora Irezumii.png|50px]]<br>'''Tora Irezumi'''<br />The lower your health, the more armor recovery rate you have. When your health is below {{color|value|25%}}, you will gain up to an additional {{color|positive|20%}} armor recovery rate. |
| − | | [[File:Ryu Irezumi.png|50px]]<br>'''Ryu Irezumi'''<br />The lower your health, the more armor recovery rate you have. When your health is below {{color|value| |
+ | | [[File:Ryu Irezumi.png|50px]]<br>'''Ryu Irezumi'''<br />The lower your health, the more armor recovery rate you have. When your health is below {{color|value|25%}}, you will gain up to an additional {{color|positive|20%}} armor recovery rate. |
| − | | [[File:Oni Irezumi.png|50px]]<br>'''Oni Irezumi'''<br />All berserker effects in this perk deck will start at {{color|positive| |
+ | | [[File:Oni Irezumi.png|50px]]<br>'''Oni Irezumi'''<br />All berserker effects in this perk deck will start at {{color|positive|50%}} health instead of {{color|value|25%}}. |
|} |
|} |
||
| − | The Yakuza deck was released with the [[Yakuza Character Pack]]. This deck encourages a high risk hit and run playstyle meant to be used with [[Berserker]] for doing a lot of damage while weaving from cover to cover to kill enemies in close combat. When combined with heavy armor such as the ICTV, the benefits are profound as you can recover armor quicker than other players. However be advised that you can only regain health using [[First Aid Kit|first aid kits]] or [[Doctor bag (Payday 2)|doctor bags]] once your health hits either the |
+ | The Yakuza deck was released with the [[Yakuza Character Pack]]. This deck encourages a high risk hit and run playstyle meant to be used with [[Berserker]] for doing a lot of damage while weaving from cover to cover to kill enemies in close combat. When combined with heavy armor such as the ICTV, the benefits are profound as you can recover armor quicker than other players. However be advised that you can only regain health using [[First Aid Kit|first aid kits]] or [[Doctor bag (Payday 2)|doctor bags]] once your health hits either the 25%/50% mark. |
|-|Ex-President= |
|-|Ex-President= |
||
{{Quote|The Ex-Presidents are one of the most daring heisting crews out there. Great risk takers and brothers in arms. Their lack of fear for their own mortality brought them together and made them as successful as they are.<br><br>An Ex-President follows no rules and only adheres to the Ozaki 8, a set of trials to honor their nature.|Deck description.}} |
{{Quote|The Ex-Presidents are one of the most daring heisting crews out there. Great risk takers and brothers in arms. Their lack of fear for their own mortality brought them together and made them as successful as they are.<br><br>An Ex-President follows no rules and only adheres to the Ozaki 8, a set of trials to honor their nature.|Deck description.}} |
||
| Line 364: | Line 364: | ||
The Maniac perk deck was released with the Hardcore Henry Pack. The perk deck encourages the user to actively kill enemies to recieve "Hysteria Stacks" the gives the user (and at tier 3, other members of the crew) a damage reduction. The max damage reduction is 36 points of damage (24 with a full bar plus 100% bonus in the final tier) which when combined with Crew Chief's perk deck can make pratically invunerable to low damage rounds. This perk deck is beneficial to armor or health builds, although dodge users can benefit from this as well in case their dodge fails. Because Maniac subtracts a flat amount from incoming damage, however, its usefulness decreases greatly on more advanced difficulties, where the sheer damage from enemies will simply overwhelm the damage absorption. |
The Maniac perk deck was released with the Hardcore Henry Pack. The perk deck encourages the user to actively kill enemies to recieve "Hysteria Stacks" the gives the user (and at tier 3, other members of the crew) a damage reduction. The max damage reduction is 36 points of damage (24 with a full bar plus 100% bonus in the final tier) which when combined with Crew Chief's perk deck can make pratically invunerable to low damage rounds. This perk deck is beneficial to armor or health builds, although dodge users can benefit from this as well in case their dodge fails. Because Maniac subtracts a flat amount from incoming damage, however, its usefulness decreases greatly on more advanced difficulties, where the sheer damage from enemies will simply overwhelm the damage absorption. |
||
|-|Anarchist= |
|-|Anarchist= |
||
| − | {{Quote|The Anarchist |
+ | {{Quote|The Anarchist refuses to acknowledge the arbitrary laws imposed by traditional authority. Kings, queens and presidents hold no sway over the Anarchist mind. Fly free and make your own rules is the motto. This refusal to abide by established truths enables the Anarchist to go where others cannot, employing unconventional tactics to slip through the cracks and reach seemingly impossible objectives.|Deck description.}} |
{| style="font-size:90%; width:100%" |
{| style="font-size:90%; width:100%" |
||
|+ |
|+ |
||
| Line 501: | Line 501: | ||
! colspan="5" style="background-color:hsla(200, 100%, 50%, 0.5)" align="center" | '''Hacker''' |
! colspan="5" style="background-color:hsla(200, 100%, 50%, 0.5)" align="center" | '''Hacker''' |
||
|- style="background-color:hsla(200, 100%, 50%, 0.15)" align="center" valign="top" |
|- style="background-color:hsla(200, 100%, 50%, 0.15)" align="center" valign="top" |
||
| − | | [[File:Code Glitch.png|50px]]<br />'''Code Glitch'''<br />Unlocks and equips the [[Pocket ECM |
+ | | [[File:Code Glitch.png|50px]]<br />'''Code Glitch'''<br />Unlocks and equips the [[Pocket ECM]].<br/>Changing to another perk deck will make the Pocket ECM Device unavailable again. The Pocket ECM Device replaces your current throwable, it can be switched out if desired. While in game you can use the throwable key to activate the Pocket ECM Device.<br/>Activating the Pocket ECM Device before the alarm is raised will trigger the jamming effect, disabling all electronics and pagers for a {{Color|value|6}} second duration.<br/>Activating the Pocket ECM Device after the alarm is raised will trigger the feedback effect, granting a chance to stun enemies on the map every second for a {{Color|value|6}} second duration.<br/>The Pocket ECM Device has {{Color|value|2}} charges with a {{Color|value|100}} second cooldown timer, but each kill you perform will shorten the cooldown timer by {{Color|value|6}} seconds.<br/>''{{color|negative|Note: Charges run on separate cooldowns. When both charges are used, the second charge will not run its cooldown or have it reduced by kills until the first charge's cooldown finishes.}}'' |
| [[File:OpSec.png|50px]]<br />'''OpSec'''<br />Your maximum health is increased by {{Color|value|20%}}. |
| [[File:OpSec.png|50px]]<br />'''OpSec'''<br />Your maximum health is increased by {{Color|value|20%}}. |
||
| − | | [[File:Bit Decay.png|50px]]<br />'''Bit Decay'''<br />Killing an enemy while the feedback effect is active will regenerate {{Color|value|20}} health. |
+ | | [[File:Bit Decay.png|50px]]<br />'''Bit Decay'''<br />Killing an enemy while the feedback effect is active will regenerate {{Color|value|20}} health.<br>''{{color|negative|Unlisted effect: Increases dodge by 15%.}}'' |
| [[File:Kluge.png|50px]]<br />'''Kluge'''<br />Killing at least {{Color|value|1}} enemy while the feedback or jamming effect is active will grant {{Color|value|20}} dodge of {{Color|value|30}} seconds. |
| [[File:Kluge.png|50px]]<br />'''Kluge'''<br />Killing at least {{Color|value|1}} enemy while the feedback or jamming effect is active will grant {{Color|value|20}} dodge of {{Color|value|30}} seconds. |
||
| − | | [[File:Botnet.png|50px]]<br />'''Botnet'''<br />Crew members killing enemies while the feedback effect is active will regenerate {{Color|value|10}} health. |
+ | | [[File:Botnet.png|50px]]<br />'''Botnet'''<br />Crew members killing enemies while the feedback effect is active will regenerate {{Color|value|10}} health.<br>''{{color|negative|Unlisted effect: Further increases dodge by another 15%.}}'' |
|}</tabber></div> |
|}</tabber></div> |
||
|} |
|} |
||
| Line 558: | Line 558: | ||
**'''OpSec''' (operational security) is an analytical process originally used by the US military for determining whether or not outside powers can observe your actions or information. |
**'''OpSec''' (operational security) is an analytical process originally used by the US military for determining whether or not outside powers can observe your actions or information. |
||
**'''Bit Decay''' is the deterioration over time of a program's performance and data integrity. |
**'''Bit Decay''' is the deterioration over time of a program's performance and data integrity. |
||
| − | **A '''Kluge''' in computer terminology is a sloppy, inefficient, or otherwise poorly designed fix or program that somehow |
+ | **A '''Kluge''' in computer terminology is a sloppy, inefficient, or otherwise poorly designed fix or program that somehow works anyway. |
**A '''Botnet''' is a network of computers infected with malware from a single source. The source is able to direct them as a group to carry out various actions, i.e. to send spam messages or launch DDoS attacks. |
**A '''Botnet''' is a network of computers infected with malware from a single source. The source is able to direct them as a group to carry out various actions, i.e. to send spam messages or launch DDoS attacks. |
||
</tabber> |
</tabber> |
||
Revision as of 17:12, 8 December 2019
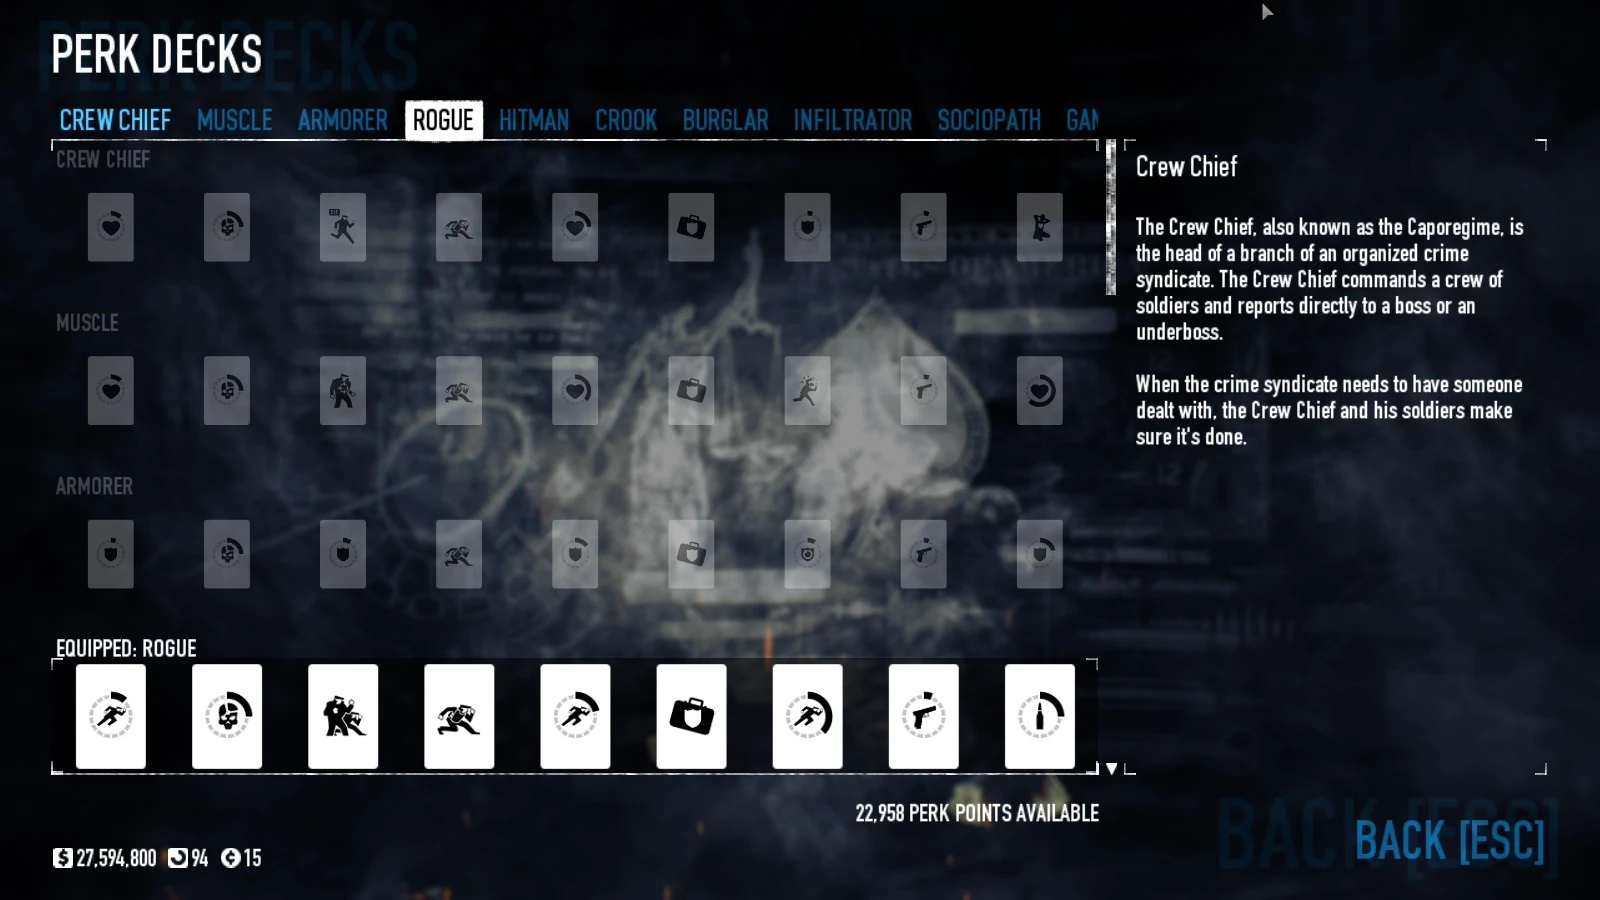

The Perk Deck selection screen.
The Perk Decks system was added on Day 5 of CrimeFest 2014, and formed one of the main parts of Update 39 along with an extensive rebalance of existing Skills.
Overview
Replacing passive tier bonuses, the Perk Decks system allows players to pick from twenty-one different "decks", each with nine perks (though the skills at second, fourth, sixth, and eighth rank are shared between all current decks). Only one perk deck can be active at a time.
Presently, Perk Decks are not reset when going Infamous.
Unlike skill trees which cannot be fully unlocked because of the limited number of skill points obtainable in-game, Perk trees rely on the player's XP income, converted into Perk Points, which is limitless, thus allowing one to eventually unlock/complete all twenty-one decks. This is offset by the fact that the player may only have one active perk deck at a time.
It costs a total of 13,700 Perk Points to fully unlock all 9 cards in a single deck, and 287,700 Points to unlock all 21 decks.
Gaining perk points is simple - after earning XP, go to the Skills & Perks screen and view the Perks Deck tab (selected in the upper left). If you have earned any experience since you last checked the Perk Decks tab, the game will then 'convert' that XP into perk points at a given ratio, which mostly depends upon current player level - as a benchline, round your level up to the nearest 10, then multiply by 10. For instance, at level 45 (rounding up to 50), the conversion ratio will be 500:1.
The conversion ratio is set by the level you were at after the skill points were added to your total, e.g. if you were level 60 (600:1 ratio) when you began a heist, but the experience gained raised you to level 61 (700:1), then the ratio for level 61 would be applied. If you should forget to convert points in between heists, the conversion calculation will apply the level you are at when you do process your perk points, even if the final heist of the series raised you to a higher conversion ratio. For example, if you had not converted points for three consecutive heists and only the final heist had raised your level to 61 (where the 700:1 ratio begins), the 700:1 ratio would still be applied to all the skill points being processed. This means it is to the player's advantage to process this conversion after every heist, just to ensure that no loss of perk points results from applying a higher conversion ratio than necessary.
The experience converted into perk points is not deducted from your overall level progress.
In addition, experience points earned past the level cap of 100 can also be converted into perk points - just visit the Perk Decks tab as you would normally.
- Note: If a player goes Infamous with un-exchanged perk points, but has yet to gain a level, the 1000:1 XP-to-perk-point ratio of the previous tier's reputation 100 still applies.
After you've earned perk points, you can now spend them on your perk decks. This is as simple as using the + (plus) button under the perk you wish to unlock. As long as a perk has not been fully unlocked, you can withdraw the points at any time by using the - (minus) button under the perk, but once a perk has been fully unlocked you can never get the points back.
Perks are on a simple line progression -- to be able to purchase the second tier perk you must first own the first tier perk, and so on.
Do note that although all perk trees has several common perk tiers, they are not shared among each other, meaning that, for example, unlocking the Crew Chief deck's Walk-In Closet perk will still cost an additional 1,600 perk points to unlock it again if one were to switch to a less-invested tree.Available Perk Decks
There are twenty-one decks in the game, with each one made up of four mutual perks, and five unique ones.
Mutual Perks
These are the perks found on each and every perk deck. The number in parentheses (e.g. (200)) beneath the tier number indicates how many perk points must be spent on that tier's skill to unlock it.
| Perk Decks | ||||
|---|---|---|---|---|
| Tier 2 (300) | Tier 4 (600) | Tier 6 (1,600) | Tier 8 (3,200) | Tier 9 (4,000) |
 Helmet Popping[1] Increases your headshot damage by 25%. |
 Blending In You gain +1 increased concealment. When wearing armor, your movement speed is 15% less affected. You gain 45% more experience when you complete days and jobs. |
 Walk-in Closet Unlocks an armor bag equipment for you to use. The armor bag can be used to change your armor during a heist. Increases your ammo pickup to 135% of the normal rate. |
 Fast and Furious You deal 5% more damage. Does not apply to melee damage, throwables, grenade launchers, crossbows, and the HRL-7 Rocket Launcher. Increases your doctor bag interaction speed by 20%. |
Deck Completion Bonus Your chance of getting a higher quality item during a PAYDAY is increased by 10%. This is given in addition to a perk deck's unique final perk. |
- ↑ Helmet Popping stacks multiplicatively; e.g. only 32 base damage is required to kill an FBI: Heavy Response Unit, who has 240 health, because 32 × 6 (headshot multiplier) × 1.25 (Helmet Popping) = 240 damage.
Unique Perks
The table below shows a comparison between the values that differ per tree. The number in parentheses (e.g. (200)) beneath the tier number indicates how many perk points must be spent on that tier's skill to unlock it.
| Perk Decks | |||||||||||||||||||||||||||||||||||||||||||||||||||||||||||||||||||||||||||||||||||||||||||||||||||||||||||||||||||||||||||||||||||||||||||||||||||||||||||||||||||||||||||||||||||||||||||||||||||||||||||||||||||||||||||||||||||||||||||||||||||||||||||||||||||||||||||||||||||||||||||||||||||||||||||||||||||||||||||
|---|---|---|---|---|---|---|---|---|---|---|---|---|---|---|---|---|---|---|---|---|---|---|---|---|---|---|---|---|---|---|---|---|---|---|---|---|---|---|---|---|---|---|---|---|---|---|---|---|---|---|---|---|---|---|---|---|---|---|---|---|---|---|---|---|---|---|---|---|---|---|---|---|---|---|---|---|---|---|---|---|---|---|---|---|---|---|---|---|---|---|---|---|---|---|---|---|---|---|---|---|---|---|---|---|---|---|---|---|---|---|---|---|---|---|---|---|---|---|---|---|---|---|---|---|---|---|---|---|---|---|---|---|---|---|---|---|---|---|---|---|---|---|---|---|---|---|---|---|---|---|---|---|---|---|---|---|---|---|---|---|---|---|---|---|---|---|---|---|---|---|---|---|---|---|---|---|---|---|---|---|---|---|---|---|---|---|---|---|---|---|---|---|---|---|---|---|---|---|---|---|---|---|---|---|---|---|---|---|---|---|---|---|---|---|---|---|---|---|---|---|---|---|---|---|---|---|---|---|---|---|---|---|---|---|---|---|---|---|---|---|---|---|---|---|---|---|---|---|---|---|---|---|---|---|---|---|---|---|---|---|---|---|---|---|---|---|---|---|---|---|---|---|---|---|---|---|---|---|---|---|---|---|---|---|---|---|---|---|---|---|---|---|---|---|---|---|---|---|---|---|---|---|---|---|---|---|---|---|---|---|---|---|---|---|---|
The Crook deck largely focuses on increasing Dodge chance for ballistic vests users, providing up to +40% dodge chance to early to mid tier armor. The final tier effect provides faster armor recovery. It should be noted that all armors (excluding the suit) have negative dodge values as their base, so this perk deck will not result in any positive chance for the player to dodge fire until several perk levels have been unlocked. The lower level the armor, the earlier this perk deck will overcome its negative base dodge stat to begin providing active assistance in dodging fire, and the higher the eventual dodge chance will be once all the dodge chance perks have been unlocked. For example, the standard Ballistic Vest has a base dodge rating of -25, so the player will see no active benefit from this perk deck until the fifth tier perk Advanced Composure has been unlocked, at which point the player will see an active dodge chance of 5% from the combined perks up to that point. This is irrespective of any boosts to dodge the player may be receiving from skills, however. As of Update #74, the Crook deck also grants up to 65% increased bonus armor when using any of the ballistic vest variants. This is enough to give the Heavy Ballistic Vest a significantly higher armor rating than the Combined Tactical Vest, as well as the Heavy Ballistic Vest having a higher dodge and speed rating.
Note: Medium range is classified as 18m or less.
Note: Medium range is classified as 18m or less.
Despite the wording, Unseen Shadow does not double the effects of Smoker.
| |||||||||||||||||||||||||||||||||||||||||||||||||||||||||||||||||||||||||||||||||||||||||||||||||||||||||||||||||||||||||||||||||||||||||||||||||||||||||||||||||||||||||||||||||||||||||||||||||||||||||||||||||||||||||||||||||||||||||||||||||||||||||||||||||||||||||||||||||||||||||||||||||||||||||||||||||||||||||||


Achievements and Trophies

|
Megalo-Mania Have all four players using a fully unlocked Maniac perkdeck and have an average of 65% or more of the white Maniac bar filled. |
")
- "Ernesto Sosa didn't like it when you destroyed his car. Or when you killed him."
- —Trophy description.
UNLOCK CONDITION:
Complete the Scarface Mansion job on the Mayhem difficulty or above in loud, with four players all using the Maniac perk deck and no skills. To complete this challenge, you have to have played the job from start to finish.
PLACEMENT:
Scarface's Room.
Trivia
- The Shadow Warrior perk refers to the video game of the same name and/or its 2013 reboot, while Killer Instinct refers to the video game series of the same name.
- Euphoria is the state of intense excitement and happiness felt when the concentration of the above four reaches a high enough level.
- Blitzkrieg Bop by Ramones.
- Straight Edge by Minor Threat.
- Death or Glory by The Clash.
- Rise Above by Black Flag.
- Lust for Life by Iggy Pop.
- Bad Guy Coming Through is from his speech in the restaurant scene after getting in an argument with Elvira Hancock.
- Play Rough is from his speech in the final scene.
- Right to the Top is from the scene where he proposes to Elvira Hancock.
- It also functions quite similarly to the "Balls Meter/Rage Mode" in the 2006 game, Scarface: The World Is Yours. When rage is activated, Tony will be immune from damage and heal himself with every kill.
- A Code Glitch is simply an error caused by the code.
- OpSec (operational security) is an analytical process originally used by the US military for determining whether or not outside powers can observe your actions or information.
- Bit Decay is the deterioration over time of a program's performance and data integrity.
- A Kluge in computer terminology is a sloppy, inefficient, or otherwise poorly designed fix or program that somehow works anyway.
- A Botnet is a network of computers infected with malware from a single source. The source is able to direct them as a group to carry out various actions, i.e. to send spam messages or launch DDoS attacks.
Gallery
")
")
")
")
")
")
")
")
")
")
")
")
")
")
")
")
")
")
")
")
")
")
")
")
")