m (INSERT PLACEHOLDER HERE ABOUT HACKER PERK DECK! JOY IS NOT IN GAME YET.) |
(Infiltrator's misleading perk description) |
||
| (34 intermediate revisions by 18 users not shown) | |||
| Line 3: | Line 3: | ||
==Overview== |
==Overview== |
||
| − | Replacing passive tier bonuses, the Perk Decks system allows players to pick from |
+ | Replacing passive tier bonuses, the Perk Decks system allows players to pick from twenty-one different "decks", each with nine perks (though the skills at second, fourth, sixth, and eighth rank are shared between all current decks). Only one perk deck can be active at a time. |
Presently, Perk Decks are '''not''' reset when going [[Infamy|Infamous]]. |
Presently, Perk Decks are '''not''' reset when going [[Infamy|Infamous]]. |
||
| − | Unlike skill trees which cannot be fully unlocked because of the limited number of skill points obtainable in-game, Perk trees rely on the player's XP income, converted into Perk Points, which is limitless, thus allowing one to eventually unlock/complete all twenty decks. This is offset by the fact that the player may only have one active perk deck at a time. |
+ | Unlike skill trees which cannot be fully unlocked because of the limited number of skill points obtainable in-game, Perk trees rely on the player's XP income, converted into Perk Points, which is limitless, thus allowing one to eventually unlock/complete all twenty-one decks. This is offset by the fact that the player may only have one active perk deck at a time. |
| − | It costs a total of 13,700 Perk Points to fully unlock all 9 cards in a single deck, and |
+ | It costs a total of 13,700 Perk Points to fully unlock all 9 cards in a single deck, and 287,700 Points to unlock all 21 decks. |
| Line 34: | Line 34: | ||
==Available Perk Decks== |
==Available Perk Decks== |
||
| − | There are twenty decks in the game, with each one made up of four mutual perks, and five unique ones. |
+ | There are twenty-one decks in the game, with each one made up of four mutual perks, and five unique ones. |
===Mutual Perks=== |
===Mutual Perks=== |
||
These are the perks found on each and every perk deck. The number in parentheses (e.g. ''(200)'') beneath the tier number indicates how many perk points must be spent on that tier's skill to unlock it. |
These are the perks found on each and every perk deck. The number in parentheses (e.g. ''(200)'') beneath the tier number indicates how many perk points must be spent on that tier's skill to unlock it. |
||
| Line 40: | Line 40: | ||
{| style="font-size:90%; width:100%" |
{| style="font-size:90%; width:100%" |
||
|- |
|- |
||
| − | ! colspan=" |
+ | ! colspan="5" style="font-size:125%; background-color:hsla(200, 100%, 50%, 0.75)" align="center" | Perk Decks |
|- style="background-color:hsla(200, 100%, 50%, 0.2)" |
|- style="background-color:hsla(200, 100%, 50%, 0.2)" |
||
! width="20%" | Tier 2 ({{Tooltip|300|500 Points spent in total}}) |
! width="20%" | Tier 2 ({{Tooltip|300|500 Points spent in total}}) |
||
| Line 48: | Line 48: | ||
! width="20%" | Tier 9 ({{Tooltip|4,000|13,700 Points spent in total}}) |
! width="20%" | Tier 9 ({{Tooltip|4,000|13,700 Points spent in total}}) |
||
|- style="background-color:hsla(200, 100%, 50%, 0.15)" align="center" valign="top" |
|- style="background-color:hsla(200, 100%, 50%, 0.15)" align="center" valign="top" |
||
| − | | [[File:Helmet Popping.png]]<br />'''Helmet Popping'''<ref>Helmet Popping stacks multiplicatively; '''e.g. only {{color|value|32}} base damage is required to kill an [[Enemies (Payday 2)#FBI: Heavy Response Unit|FBI |
+ | | [[File:Helmet Popping.png]]<br />'''Helmet Popping'''<ref>Helmet Popping stacks multiplicatively; '''e.g. only {{color|value|32}} base damage is required to kill an [[Enemies (Payday 2)#FBI: Heavy Response Unit|FBI Heavy Response Unit]], who has {{color|value|240}} health, because 32 × 6 (headshot multiplier) × 1.25 (Helmet Popping) = 240 damage'''.</ref><br />Increases your headshot damage by {{color|positive|25%}}. |
| [[File:Blending In.png]]<br />'''Blending In'''<br />You gain {{color|positive|+1}} increased concealment.<br />When wearing armor, your movement speed is {{color|positive|15%}} less affected.<br />You gain {{color|positive|45%}} more experience when you complete days and jobs. |
| [[File:Blending In.png]]<br />'''Blending In'''<br />You gain {{color|positive|+1}} increased concealment.<br />When wearing armor, your movement speed is {{color|positive|15%}} less affected.<br />You gain {{color|positive|45%}} more experience when you complete days and jobs. |
||
| [[File:Walk In Closet.png]]<br />'''Walk-in Closet'''<br />Unlocks an armor bag equipment for you to use. The armor bag can be used to change your armor during a heist.<br />Increases your ammo pickup to {{color|positive|135%}} of the normal rate. |
| [[File:Walk In Closet.png]]<br />'''Walk-in Closet'''<br />Unlocks an armor bag equipment for you to use. The armor bag can be used to change your armor during a heist.<br />Increases your ammo pickup to {{color|positive|135%}} of the normal rate. |
||
| Line 76: | Line 76: | ||
|- style="background-color:hsla(200, 100%, 50%, 0.15)" align="center" valign="top" |
|- style="background-color:hsla(200, 100%, 50%, 0.15)" align="center" valign="top" |
||
| [[File:Brute Strength.png|50px]]<br>'''Brute Strength'''<br />You grant {{color|positive|8%}} damage reduction for players in your group. This bonus is doubled for you when you are under {{color|value|50%}} health. |
| [[File:Brute Strength.png|50px]]<br>'''Brute Strength'''<br />You grant {{color|positive|8%}} damage reduction for players in your group. This bonus is doubled for you when you are under {{color|value|50%}} health. |
||
| − | | [[File:Marathon Man.png|50px]]<br>'''Marathon Man'''<br />You and your crew's stamina is increased by {{color|positive|50%}}.<br />Increases your shout distance by {{color|positive|25%}}.<br />When you are within medium range of an enemy, you |
+ | | [[File:Marathon Man.png|50px]]<br>'''Marathon Man'''<br />You and your crew's stamina is increased by {{color|positive|50%}}.<ref name="note">Crew perk bonuses do not stack.</ref><br />Increases your shout distance by {{color|positive|25%}}.<br />When you are within medium range of an enemy, you receive {{color|positive|6%}} less damage from enemies.<br/>''{{color|negative|Note: The damage reduction requires the [[Underdog]] skill to function.}}'' |
| [[File:Wolf Pack.png|50px]]<br>'''Wolf Pack'''<br />Your crew will gain {{color|positive|10%}} more health. |
| [[File:Wolf Pack.png|50px]]<br>'''Wolf Pack'''<br />Your crew will gain {{color|positive|10%}} more health. |
||
You will gain {{color|positive|20%}} more health.<ref name="note" /> |
You will gain {{color|positive|20%}} more health.<ref name="note" /> |
||
| Line 82: | Line 82: | ||
| [[File:Hostage Situation.png|50px]]<br>'''Hostage Situation'''<br />You and your crew will gain {{color|positive|6%}} max health and {{color|positive|12%}} stamina for every hostage up to {{color|positive|4}} times. You and your crew will gain {{color|positive|8%}} damage reduction for having one or more hostages.<ref name="note" /><ref name="converted_cop" /> |
| [[File:Hostage Situation.png|50px]]<br>'''Hostage Situation'''<br />You and your crew will gain {{color|positive|6%}} max health and {{color|positive|12%}} stamina for every hostage up to {{color|positive|4}} times. You and your crew will gain {{color|positive|8%}} damage reduction for having one or more hostages.<ref name="note" /><ref name="converted_cop" /> |
||
|} |
|} |
||
| − | The Crew Chief deck is well-rounded, increasing the user's health and offering team-wide benefits such as increased stamina, health, and armor. The increase in shout distance provided by the third perk in this deck, Marathon Man, does '''''not''''' provide an increase to the 9 meter range of the Mastermind skill [[Inspire]]. As of [[PC update history (Payday 2)#Update .2374|Update #74]], the final perk also grants an {{Color|value|8%}} damage reduction for the crew as long as one tied hostage is present. |
+ | The Crew Chief deck is well-rounded, increasing the user's health and offering team-wide benefits such as increased stamina, health, and armor. The increase in shout distance provided by the third perk in this deck, Marathon Man, does '''''not''''' provide an increase to the 9 meter range of the Mastermind skill [[Inspire]]. As of [[PC update history (Payday 2)#Update .2374|Update #74]], the final perk also grants an {{Color|value|8%}} damage reduction for the crew as long as one tied hostage is present. |
|-|Muscle= |
|-|Muscle= |
||
| − | {{Quote|The Muscle is a tough guy who uses violence to send messages from his Mafia |
+ | {{Quote|The Muscle is a tough guy who uses violence to send messages from his Mafia superiors. They are the backbone of any criminal organization.<br/><br/>The muscle is called in whenever you need to rough someone up, break some legs, crush a skull or remind people who's boss.|Deck description.}} |
{| style="font-size:90%; width:100%" |
{| style="font-size:90%; width:100%" |
||
|+ |
|+ |
||
| Line 124: | Line 124: | ||
| [[File:Liquid Armor.png|50px]]<br>'''Liquid Armor'''<br />You gain an additional {{color|positive|5%}} more armor.<br />Reduces the armor recovery time for you and your crew by {{color|positive|10%}}.<ref name="note" /> |
| [[File:Liquid Armor.png|50px]]<br>'''Liquid Armor'''<br />You gain an additional {{color|positive|5%}} more armor.<br />Reduces the armor recovery time for you and your crew by {{color|positive|10%}}.<ref name="note" /> |
||
|} |
|} |
||
| − | The Armorer deck focuses on improving armor durability and recovery time, with a potential maximum of {{color|value|+35%}} armor. A simple but effective choice for players who wish to enhance their already-durable armor, or patch up their defenses a little. Since the perks which improve armor rating are applied as percentages of your armor's base armor rating, this perk deck grants the largest gains to players who customarily wear the heaviest [[armors]], i.e. the Combined Tactical Vest and Improved Combined Tactical Vest. For that reason players who are focusing on the [[Skills#Fugitive|Fugitive]] skill tree's boosts for wearers of ballistic vests might do better to make use of either the Hitman or Crook perk deck instead. |
+ | The Armorer deck focuses on improving armor durability and recovery time, with a potential maximum of {{color|value|+35%}} armor. A simple but effective choice for players who wish to enhance their already-durable armor, or patch up their defenses a little. Since the perks which improve armor rating are applied as percentages of your armor's base armor rating, this perk deck grants the largest gains to players who customarily wear the heaviest [[armors]], i.e. the Combined Tactical Vest and Improved Combined Tactical Vest. For that reason players who are focusing on the [[Skills#Fugitive|Fugitive]] skill tree's boosts for wearers of ballistic vests might do better to make use of either the Hitman or Crook perk deck instead. Another use of this perk deck is the invulnerability period when armor is broken. Players can abuse this ability to effectively negate lethal amounts of damage, a tactic that is especially useful on the highest difficulties. |
|-|Rogue= |
|-|Rogue= |
||
{{Quote|The Rogue is a stealthy criminal, capable of sneaky tricks and deadly force. Versatile and deceptive, the Rogue is hired to do anything from pickpocketing, to burglaries and con jobs.<br/><br/>The trademark of a Rogue is his versatility - what he lacks in strength he makes up for in skill.|Deck description.}} |
{{Quote|The Rogue is a stealthy criminal, capable of sneaky tricks and deadly force. Versatile and deceptive, the Rogue is hired to do anything from pickpocketing, to burglaries and con jobs.<br/><br/>The trademark of a Rogue is his versatility - what he lacks in strength he makes up for in skill.|Deck description.}} |
||
| Line 226: | Line 226: | ||
! colspan="5" style="background-color:hsla(200, 100%, 50%, 0.5)" align="center" | '''Infiltrator''' |
! colspan="5" style="background-color:hsla(200, 100%, 50%, 0.5)" align="center" | '''Infiltrator''' |
||
|- style="background-color:hsla(200, 100%, 50%, 0.15)" align="center" valign="top" |
|- style="background-color:hsla(200, 100%, 50%, 0.15)" align="center" valign="top" |
||
| − | | [[File:OVERDOG.png|50px]]<br>'''OVERDOG'''<br />When you are surrounded by three enemies or more, you receive {{color|positive|12%}} less damage from enemies.<br />Your second and each consecutive melee hit within {{color|value| |
+ | | [[File:OVERDOG.png|50px]]<br>'''OVERDOG'''<br />When you are surrounded by three enemies or more, you receive {{color|positive|12%}} less damage from enemies.<br />Your second and each consecutive melee hit within {{color|value|1}} second of the last one will deal {{color|value|10}} times its normal damage.<br/>''{{color|negative|Note: Missing a melee strike resets the buff. The buff can be activated by hitting team AI and civilians as well. Effect does not restart, nor become active if an enemy is countered using [[Counterstrike|Counterstrike]].}}'' |
| [[File:Basic Close Combat.png|50px]]<br>'''Basic Close Combat'''<br />When you are within medium range of an enemy, you receive {{color|positive|8%}} less damage from enemies. |
| [[File:Basic Close Combat.png|50px]]<br>'''Basic Close Combat'''<br />When you are within medium range of an enemy, you receive {{color|positive|8%}} less damage from enemies. |
||
| − | | [[File:Advanced Close Combat.png|50px]]<br>'''Advanced Close Combat'''<br />When you are within medium range of an enemy, you receive an additional {{color|positive|8%}} less damage from enemies. |
+ | | [[File:Advanced Close Combat.png|50px]]<br>'''Advanced Close Combat'''<br />When you are within medium range of an enemy, you receive an additional {{color|positive|8%}} less damage from enemies.<br/>''{{color|negative|Unlisted effect: An additional 6 seconds are added to '''OVERDOG''''s duration of the extra damage on melee strike, for a total of 7 seconds before expiring.}}'' |
| [[File:Expert Close Combat.png|50px]]<br>'''Expert Close Combat'''<br />When you are within medium range of an enemy, you receive an additional {{color|positive|8%}} less damage from enemies. |
| [[File:Expert Close Combat.png|50px]]<br>'''Expert Close Combat'''<br />When you are within medium range of an enemy, you receive an additional {{color|positive|8%}} less damage from enemies. |
||
| [[File:Life Drain.png|50px]]<br>'''Life Drain'''<br />Striking an enemy with your melee weapon regenerates {{color|positive|20%}} of your health. This cannot occur more than once every {{color|value|10}} seconds.<ref name="converted_cop">This effect can be triggered on Jokered cops as well.</ref> |
| [[File:Life Drain.png|50px]]<br>'''Life Drain'''<br />Striking an enemy with your melee weapon regenerates {{color|positive|20%}} of your health. This cannot occur more than once every {{color|value|10}} seconds.<ref name="converted_cop">This effect can be triggered on Jokered cops as well.</ref> |
||
| Line 248: | Line 248: | ||
! colspan="5" style="background-color:hsla(200, 100%, 50%, 0.5)" align="center" | '''Sociopath''' |
! colspan="5" style="background-color:hsla(200, 100%, 50%, 0.5)" align="center" | '''Sociopath''' |
||
|- style="background-color:hsla(200, 100%, 50%, 0.15)" align="center" valign="top" |
|- style="background-color:hsla(200, 100%, 50%, 0.15)" align="center" valign="top" |
||
| − | | [[File:OVERDOG.png|50px]]<br>'''OVERDOG'''<br />When you are surrounded by three enemies or more, you receive {{color|positive|12%}} less damage from enemies.<br />Your second and each consecutive melee hit within {{color|value|1}} second of the last one will deal {{color|value|10}} times its normal damage.<br/>''{{color|negative|Note: Missing a melee strike resets the buff. The buff can be activated |
+ | | [[File:OVERDOG.png|50px]]<br>'''OVERDOG'''<br />When you are surrounded by three enemies or more, you receive {{color|positive|12%}} less damage from enemies.<br />Your second and each consecutive melee hit within {{color|value|1}} second of the last one will deal {{color|value|10}} times its normal damage.<br/>''{{color|negative|Note: Missing a melee strike resets the buff. The buff can be activated by hitting team AI and civilians as well. Effect does not restart, nor become active if an enemy is countered using [[Counterstrike|Counterstrike]].}} |
| [[File:Tension.png|50px]]<br>'''Tension'''<br />Killing an enemy regenerates {{color|positive|30}} armor.<br />This cannot occur more than once every {{color|value|1}} second.<br />You gain an additional {{color|value|10%}} armor. |
| [[File:Tension.png|50px]]<br>'''Tension'''<br />Killing an enemy regenerates {{color|positive|30}} armor.<br />This cannot occur more than once every {{color|value|1}} second.<br />You gain an additional {{color|value|10%}} armor. |
||
| [[File:Clean Hit.png|50px]]<br>'''Clean Hit'''<br />Killing an enemy with a melee weapon regenerates {{color|positive|10%}} health.<br />This cannot occur more than once every {{color|value|1}} second.<br />When you are within medium range of an enemy you recieve {{color|value|8%}} less damage. |
| [[File:Clean Hit.png|50px]]<br>'''Clean Hit'''<br />Killing an enemy with a melee weapon regenerates {{color|positive|10%}} health.<br />This cannot occur more than once every {{color|value|1}} second.<br />When you are within medium range of an enemy you recieve {{color|value|8%}} less damage. |
||
| Line 312: | Line 312: | ||
! colspan="5" style="background-color:hsla(200, 100%, 50%, 0.5)" align="center" | '''Yakuza''' |
! colspan="5" style="background-color:hsla(200, 100%, 50%, 0.5)" align="center" | '''Yakuza''' |
||
|- style="background-color:hsla(200, 100%, 50%, 0.15)" align="center" valign="top" |
|- style="background-color:hsla(200, 100%, 50%, 0.15)" align="center" valign="top" |
||
| − | | [[File:Koi Irezumi.png|50px]]<br>'''Koi Irezumi'''<br />The lower your health, the more armor recovery rate you have. When your health is below {{color|value| |
+ | | [[File:Koi Irezumi.png|50px]]<br>'''Koi Irezumi'''<br />The lower your health, the more armor recovery rate you have. When your health is below {{color|value|25%}}, you will gain up to {{color|positive|20%}} armor recovery rate.<br />{{color|event|Entering this state negates regeneration effects.}} Bonuses scale linearly with health. |
| − | | [[File:Hebi Irezumi.png|50px]]<br>'''Hebi Irezumi'''<br />The lower your health, the more movement speed you gain. When your health is below {{color|value| |
+ | | [[File:Hebi Irezumi.png|50px]]<br>'''Hebi Irezumi'''<br />The lower your health, the more movement speed you gain. When your health is below {{color|value|25%}}, you will gain up to {{color|positive|20%}} movement speed. |
| − | | [[File:Tora Irezumii.png|50px]]<br>'''Tora Irezumi'''<br />The lower your health, the more armor recovery rate you have. When your health is below {{color|value| |
+ | | [[File:Tora Irezumii.png|50px]]<br>'''Tora Irezumi'''<br />The lower your health, the more armor recovery rate you have. When your health is below {{color|value|25%}}, you will gain up to an additional {{color|positive|20%}} armor recovery rate. |
| − | | [[File:Ryu Irezumi.png|50px]]<br>'''Ryu Irezumi'''<br />The lower your health, the more armor recovery rate you have. When your health is below {{color|value| |
+ | | [[File:Ryu Irezumi.png|50px]]<br>'''Ryu Irezumi'''<br />The lower your health, the more armor recovery rate you have. When your health is below {{color|value|25%}}, you will gain up to an additional {{color|positive|20%}} armor recovery rate. |
| − | | [[File:Oni Irezumi.png|50px]]<br>'''Oni Irezumi'''<br />All berserker effects in this perk deck will start at {{color|positive| |
+ | | [[File:Oni Irezumi.png|50px]]<br>'''Oni Irezumi'''<br />All berserker effects in this perk deck will start at {{color|positive|50%}} health instead of {{color|value|25%}}. |
|} |
|} |
||
| − | The Yakuza deck was released with the [[Yakuza Character Pack]]. This deck encourages a high risk hit and run playstyle meant to be used with [[Berserker]] for doing a lot of damage while weaving from cover to cover to kill enemies in close combat. When combined with heavy armor such as the ICTV, the benefits are profound as you can recover armor quicker than other players. However be advised that you can only regain health using [[First Aid Kit|first aid kits]] or [[Doctor bag (Payday 2)|doctor bags]] once your health hits either the |
+ | The Yakuza deck was released with the [[Yakuza Character Pack]]. This deck encourages a high risk hit and run playstyle meant to be used with [[Berserker]] for doing a lot of damage while weaving from cover to cover to kill enemies in close combat. When combined with heavy armor such as the ICTV, the benefits are profound as you can recover armor quicker than other players. However be advised that you can only regain health using [[First Aid Kit|first aid kits]] or [[Doctor bag (Payday 2)|doctor bags]] once your health hits either the 25%/50% mark. |
|-|Ex-President= |
|-|Ex-President= |
||
{{Quote|The Ex-Presidents are one of the most daring heisting crews out there. Great risk takers and brothers in arms. Their lack of fear for their own mortality brought them together and made them as successful as they are.<br><br>An Ex-President follows no rules and only adheres to the Ozaki 8, a set of trials to honor their nature.|Deck description.}} |
{{Quote|The Ex-Presidents are one of the most daring heisting crews out there. Great risk takers and brothers in arms. Their lack of fear for their own mortality brought them together and made them as successful as they are.<br><br>An Ex-President follows no rules and only adheres to the Ozaki 8, a set of trials to honor their nature.|Deck description.}} |
||
| Line 339: | Line 339: | ||
| [[File:The Perfect Line.png|50px]]<br>'''The Perfect Line'''<br />Killing an enemy speeds up your armor recovery time depending on how much armor you have. The more armor the less recovery speed gained per kill.<br />Armor recovery speed is reset whenever your armor recovers. |
| [[File:The Perfect Line.png|50px]]<br>'''The Perfect Line'''<br />Killing an enemy speeds up your armor recovery time depending on how much armor you have. The more armor the less recovery speed gained per kill.<br />Armor recovery speed is reset whenever your armor recovers. |
||
|} |
|} |
||
| − | The Ex-President deck was released with the Bodhi Character Pack. The deck focuses on armor and health restoration after killing enemies. It shares some similarities to |
+ | The Ex-President deck was released with the Bodhi Character Pack. The deck focuses on armor and health restoration after killing enemies. It shares some similarities to the Grinder perk deck, albeit with some differences.<br/> |
| + | *A target must be killed in order to obtain the effect. |
||
| + | **Grinder simply injures an enemy. |
||
| + | *Constantly demands for the heister to engage with enemies. |
||
| + | **Same concept, although Grinder requires to engage more in order to injure enemies, and thus be healed, while Ex-President can simply store its HP when needed. |
||
| + | *Encourages using low armor for higher perk deck effect rewards. |
||
| + | **Grinder's effects can only be activated by using the Two-Piece Suit, or Lightweight Ballistic Vest. |
||
| + | All HP obtained from killing is moved to a 'storage'. The HP from the storage can be reclaimed once the Ex-President loses all its armor, and then regenerates so. One can also claim the stored HP by using [[Bullseye|Bullseye]], even if it's not the full armor. Any loss of health is restored equivalent to the amount stored.<br/> |
||
| + | Additionally, in comparison to the Grinder perk deck, Ex-President is allowed to wear any armor and still be able to use its unique perk skills, unlike Grinder, who is restricted to using Lightweight Ballistic Vests or Two-Piece Suits, or else they will not get any HP regeneration. This, however, comes at the cost that the bigger the armor, the smaller the HP regeneration capacity.<br/> |
||
| + | Finally, other teammates can contribute to the perk deck holder by killing enemies just as if it were the Ex-President, but only the perk deck holder will be benefited. All other crew members will not receive any benefits, similar to the Biker perk deck. |
||
|-|Maniac= |
|-|Maniac= |
||
{{Quote|The Maniac Perk Deck is the embodiment of crazy and to never accept bad odds in moments of danger. By pushing through and constantly deal damage, your fellow heisters will be granted a temporary shield making all of you feel Jimmy's invulnerable spirit.|Deck description.}} |
{{Quote|The Maniac Perk Deck is the embodiment of crazy and to never accept bad odds in moments of danger. By pushing through and constantly deal damage, your fellow heisters will be granted a temporary shield making all of you feel Jimmy's invulnerable spirit.|Deck description.}} |
||
| Line 362: | Line 371: | ||
| [[File:Insanity.png|50px]]<br>'''Insanity'''<br />Damage absorption from Hysteria Stacks on you is increased by {{Color|value|100%}}. |
| [[File:Insanity.png|50px]]<br>'''Insanity'''<br />Damage absorption from Hysteria Stacks on you is increased by {{Color|value|100%}}. |
||
|} |
|} |
||
| − | The Maniac perk deck was released with the Hardcore Henry Pack. The perk deck encourages the user to actively kill enemies to |
+ | The Maniac perk deck was released with the Hardcore Henry Pack. The perk deck encourages the user to actively kill enemies to receive "Hysteria Stacks" the gives the user (and at tier 3, other members of the crew) a damage reduction. The max damage reduction is 36 points of damage (24 with a full bar plus 100% bonus in the final tier) which when combined with Crew Chief's perk deck can make practically invulnerable to low damage rounds. This perk deck is beneficial to armor or health builds, although dodge users can benefit from this as well in case their dodge fails. Because Maniac subtracts a flat amount from incoming damage, however, its usefulness decreases greatly on more advanced difficulties, where the sheer damage from enemies will simply overwhelm the damage absorption. |
|-|Anarchist= |
|-|Anarchist= |
||
| − | {{Quote|The Anarchist |
+ | {{Quote|The Anarchist refuses to acknowledge the arbitrary laws imposed by traditional authority. Kings, queens and presidents hold no sway over the Anarchist mind. Fly free and make your own rules is the motto. This refusal to abide by established truths enables the Anarchist to go where others cannot, employing unconventional tactics to slip through the cracks and reach seemingly impossible objectives.|Deck description.}} |
{| style="font-size:90%; width:100%" |
{| style="font-size:90%; width:100%" |
||
|+ |
|+ |
||
| Line 383: | Line 392: | ||
| [[File:Lust for Life.png|50px]]<br>'''Lust for Life'''<br />Dealing damage will grant you {{Color|positive|10}} armor - this can only occur once every {{Color|value|1.5}} seconds.<br/>''{{color|negative|Note: Despite saying 10, it has always granted 30 armor.}}'' |
| [[File:Lust for Life.png|50px]]<br>'''Lust for Life'''<br />Dealing damage will grant you {{Color|positive|10}} armor - this can only occur once every {{Color|value|1.5}} seconds.<br/>''{{color|negative|Note: Despite saying 10, it has always granted 30 armor.}}'' |
||
|} |
|} |
||
| + | The Anarchist perk was released with the Sydney Character Pack. The deck grants armor at the cost of health and enables continuous armor regeneration, rather than regenerating outside of direct combat. This trait allows Anarchists to tank incredible amounts of damage even without equipping supplementary armor. Equipping heavier armors will increase the amount of armor regained, although at significantly longer intervals. The final perk also allows attacks to restore armor, which pairs well with [[Bullseye]]. This effectively grants Anarchists three different ways to regenerate armor. The damage-mitigating nature of armor combined with the brief period of invincibility when armor is broken makes Anarchist one of the favored perk decks for the highest difficulties, where evading or negating damage is critical. |
||
| − | |||
| − | The Anarchist perk was released with the Sydney Character Pack. The deck gives the player more armor and gives them continuous armor regeneration, rather than the usual waiting before regeneration. The deck has maximum effect when the full body armor is equipped. This deck works great with Enforcer's and Technician's damage mitigation abilities. |
||
| − | |||
|-|Biker= |
|-|Biker= |
||
{{Quote|Biker gangs are feared all over the world, and the biggest clubs are common household names. To be a biker you need to be tough and loyal, and know that the rules of the club are absolute. Bikers are known to be ruthless and violent people, and they are never afraid to challenge anyone that dare to cross them.<br><br>When wearing your patch and riding your bike, you proclaim to everyone that you belong to the 1%. The 1% that refuse to follow the rules of society and proudly carry the title of Outlaw. For a biker, all that matters are your fellow club members and your ride.|Deck description.}} |
{{Quote|Biker gangs are feared all over the world, and the biggest clubs are common household names. To be a biker you need to be tough and loyal, and know that the rules of the club are absolute. Bikers are known to be ruthless and violent people, and they are never afraid to challenge anyone that dare to cross them.<br><br>When wearing your patch and riding your bike, you proclaim to everyone that you belong to the 1%. The 1% that refuse to follow the rules of society and proudly carry the title of Outlaw. For a biker, all that matters are your fellow club members and your ride.|Deck description.}} |
||
| Line 421: | Line 428: | ||
! colspan="5" style="background-color:hsla(200, 100%, 50%, 0.5)" align="center" | '''Kingpin''' |
! colspan="5" style="background-color:hsla(200, 100%, 50%, 0.5)" align="center" | '''Kingpin''' |
||
|- style="background-color:hsla(200, 100%, 50%, 0.15)" align="center" valign="top" |
|- style="background-color:hsla(200, 100%, 50%, 0.15)" align="center" valign="top" |
||
| − | | [[File:Bad Guy Coming Through.png|50px]]<br>'''Bad Guy Coming Through'''<br />Unlocks and equips the [[Injector|Kingpin Injector]]. Changing to another perk deck will make the Injector unavailable again. The Injector replaces your current throwable, is equipped in your throwable slot and can be switched out if desired.<br>While in game you can use the throwable key to activate the Injector. Activating the Injector will heal you with {{color|value|75%}} of all damage taken for {{color|value|6}} seconds.{{Sic}}<br>You can still take damage during the effect. The Injector can only be used once every {{color|value|30}} seconds. |
+ | | [[File:Bad Guy Coming Through.png|50px]]<br>'''Bad Guy Coming Through'''<br />Unlocks and equips the [[Injector|Kingpin Injector]]. Changing to another perk deck will make the Injector unavailable again. The Injector replaces your current throwable, is equipped in your throwable slot and can be switched out if desired.<br>While in game you can use the throwable key to activate the Injector. Activating the Injector will heal you with {{color|value|75%}} of all damage taken for {{color|value|6}} seconds.{{Sic}}<br>You can still take damage during the effect. The Injector can only be used once every {{color|value|30}} seconds.<br/>''{{color|negative|Unlisted effect: Every kill reduces the cooldown by 1 second.}}'' |
| [[File:Play Rough.png|50px]]<br>'''Play Rough'''<br />You gain {{color|positive|10%}} more health. |
| [[File:Play Rough.png|50px]]<br>'''Play Rough'''<br />You gain {{color|positive|10%}} more health. |
||
| [[File:Public Enemy No.1.png|50px]]<br>'''Public Enemy No.1'''<br />You gain {{color|positive|10%}} more health.<br />Enemies nearby will prefer targeting you, whenever possible, while the Injector effect is active. |
| [[File:Public Enemy No.1.png|50px]]<br>'''Public Enemy No.1'''<br />You gain {{color|positive|10%}} more health.<br />Enemies nearby will prefer targeting you, whenever possible, while the Injector effect is active. |
||
| [[File:Balls vs. Bullets.png|50px]]<br>'''Balls vs. Bullets'''<br />You gain {{color|positive|20%}} more health.<br>The amount of health received during the Injector effect is increased by {{color|positive|25%}} while below {{color|positive|50%}} health. |
| [[File:Balls vs. Bullets.png|50px]]<br>'''Balls vs. Bullets'''<br />You gain {{color|positive|20%}} more health.<br>The amount of health received during the Injector effect is increased by {{color|positive|25%}} while below {{color|positive|50%}} health. |
||
| − | | [[File:Right to the Top.png|50px]]<br>'''Right to the Top'''<br />You gain {{color|positive|40%}} more health.<br>For every {{color|positive|5}} points of health gained during the Injector effect while at maximum health, the recharge time of the injector is reduced by {{color|positive|1}} second. |
+ | | [[File:Right to the Top.png|50px]]<br>'''Right to the Top'''<br />You gain {{color|positive|40%}} more health.<br>For every {{color|positive|5}} points of health gained during the Injector effect while at maximum health, the recharge time of the injector is reduced by {{color|positive|1}} second.<br/>''{{color|negative|Note: Actually activates every 50 points of health gained.}}'' |
|} |
|} |
||
The Kingpin perk deck was released with the Scarface Character pack. Its whole kit and playstyle revolves around painting yourself as a target and drawing fire from your team while taking less damage and regenerate health constantly with the deck-exclusive [[Injector]]. Since the Injector can be used an infinite amount of times but with a short cooldown in between each uses, a good Kingpin must time their use of the item to ensure maximum effectiveness. |
The Kingpin perk deck was released with the Scarface Character pack. Its whole kit and playstyle revolves around painting yourself as a target and drawing fire from your team while taking less damage and regenerate health constantly with the deck-exclusive [[Injector]]. Since the Injector can be used an infinite amount of times but with a short cooldown in between each uses, a good Kingpin must time their use of the item to ensure maximum effectiveness. |
||
| Line 442: | Line 449: | ||
! colspan="5" style="background-color:hsla(200, 100%, 50%, 0.5)" align="center" | '''Sicario''' |
! colspan="5" style="background-color:hsla(200, 100%, 50%, 0.5)" align="center" | '''Sicario''' |
||
|- style="background-color:hsla(200, 100%, 50%, 0.15)" align="center" valign="top" |
|- style="background-color:hsla(200, 100%, 50%, 0.15)" align="center" valign="top" |
||
| − | | [[File:Smoker.png|50px]]<br>'''Smoker'''<br />Unlocks and equips the throwable [[ |
+ | | [[File:Smoker.png|50px]]<br>'''Smoker'''<br />Unlocks and equips the throwable [[Smoke Bomb]]. When deployed, the smoke bomb creates a smoke screen that lasts for {{color|value|10}} seconds. While standing inside the smoke screen, you and any of your allies automatically avoid {{color|value|50%}} of all bullets. Any enemies that stand in the smoke will see their accuracy reduced by {{color|value|50%}}. After the smoke screen dissipates, the Smoke Bomb is on a cooldown for {{color|value|60}} seconds, but killing enemies will reduce this cooldown by {{color|value|1}} second. |
| [[File:Twitch.png|50px]]<br>'''Twitch'''<br />Every time the player gets shot, {{color|value|20%}} dodge chance is gained. This effect is reset once the player dodges and will not occur for the next {{color|value|4}} second.{{sic}} |
| [[File:Twitch.png|50px]]<br>'''Twitch'''<br />Every time the player gets shot, {{color|value|20%}} dodge chance is gained. This effect is reset once the player dodges and will not occur for the next {{color|value|4}} second.{{sic}} |
||
| [[File:Subtle2.png|50px]]<br>'''Subtle'''<br />Your chance to dodge is increased by {{color|value|15%}}. |
| [[File:Subtle2.png|50px]]<br>'''Subtle'''<br />Your chance to dodge is increased by {{color|value|15%}}. |
||
| Line 485: | Line 492: | ||
! colspan="5" style="background-color:hsla(200, 100%, 50%, 0.5)" align="center" | '''Tag Team''' |
! colspan="5" style="background-color:hsla(200, 100%, 50%, 0.5)" align="center" | '''Tag Team''' |
||
|- style="background-color:hsla(200, 100%, 50%, 0.15)" align="center" valign="top" |
|- style="background-color:hsla(200, 100%, 50%, 0.15)" align="center" valign="top" |
||
| − | | [[File:Soul Mates.png|50px]]<br />'''Soul Mates'''<br />Unlocks and equips the [[Gas Dispenser]].<br />To activate the Gas Dispenser you need to look at another allied unit within a {{color|value|18}} meter radius with clear line of sight and press the throwable key to tag them.<br />Each enemy you or the tagged unit kills will now heal you for {{color|value|15}} health and the tagged unit for {{color|value|7.5}} health.<br />Each enemy you kill will now extend the duration by {{color|value|1.3}} seconds and reduce the cooldown timer by 2 seconds.<br />The effect will last for a duration of {{color|value|2}} seconds and has a cooldown of {{color|value|12}} seconds.<br/>''{{color|negative|Note: The effect actually has a duration of 12 seconds with a cooldown of 60 seconds. The cooldown begins immediately upon usage, rather than after the effect ends.}}'' |
+ | | [[File:Soul Mates.png|50px]]<br />'''Soul Mates'''<br />Unlocks and equips the [[Gas Dispenser]].<br />To activate the Gas Dispenser you need to look at another allied unit within a {{color|value|18}} meter radius with clear line of sight and press the throwable key to tag them.<br />Each enemy you or the tagged unit kills will now heal you for {{color|value|15}} health and the tagged unit for {{color|value|7.5}} health.<br />Each enemy you kill will now extend the duration by {{color|value|1.3}} seconds and reduce the cooldown timer by 2 seconds.<br />The effect will last for a duration of {{color|value|2}} seconds and has a cooldown of {{color|value|12}} seconds.<br/>''{{color|negative|Note: The effect actually has a duration of 12 seconds with a cooldown of 60 seconds. The cooldown begins immediately upon usage, rather than after the effect ends. The cooldown reduction on kill is always active, not only when the Dispenser is in use.}}'' |
| [[File:Scent.png|50px]]<br />'''Scent'''<br />Your maximum health is increased by {{Color|value|20%}}. |
| [[File:Scent.png|50px]]<br />'''Scent'''<br />Your maximum health is increased by {{Color|value|20%}}. |
||
| [[File:Synergy.png|50px]]<br />'''Synergy'''<br />Each enemy you or the tagged unit kills will now grant you {{color|value|2}} absorption up to a maximum of {{color|value|20}}.<br />This effect will last until the perk deck item goes out of cooldown. |
| [[File:Synergy.png|50px]]<br />'''Synergy'''<br />Each enemy you or the tagged unit kills will now grant you {{color|value|2}} absorption up to a maximum of {{color|value|20}}.<br />This effect will last until the perk deck item goes out of cooldown. |
||
| [[File:Inhale.png|50px]]<br />'''Inhale'''<br />Your maximum health is increased by {{Color|value|20%}}. |
| [[File:Inhale.png|50px]]<br />'''Inhale'''<br />Your maximum health is increased by {{Color|value|20%}}. |
||
| [[File:Harmony.png|50px]]<br />'''Harmony'''<br />Each enemy the tagged unit kills will now reduce your perk deck item cooldown timer by {{color|value|2}} seconds until you are no longer paired. |
| [[File:Harmony.png|50px]]<br />'''Harmony'''<br />Each enemy the tagged unit kills will now reduce your perk deck item cooldown timer by {{color|value|2}} seconds until you are no longer paired. |
||
| + | |-|Hacker= |
||
| − | |}</tabber></div> |
||
| + | {{Quote|Using your sharp mind and gear, you can bring any security system to it's{{sic}} knees with the push of a button. You are never caught unaware by a camera or security guard, but if things do go awry, you can just as easily brute-force your way into enemy comms to deliver a nasty surprise for anyone listening.|Deck description.}} |
||
| − | |} |
||
| − | <!-- |-|Hacker= EVERYTHING BELOW IS A PLACEHOLDER, AS THE CHARACTER JOY IS NOT IN THE GAME PROPER YET! |
||
| − | {{Quote|Flygande bäckasiner söka hwila på mjuka tuvor.}} |
||
{| style="font-size:90%; width:100%" |
{| style="font-size:90%; width:100%" |
||
| − | |+ |
||
|- |
|- |
||
|- style="background-color:hsla(200, 100%, 50%, 0.2)" |
|- style="background-color:hsla(200, 100%, 50%, 0.2)" |
||
| Line 504: | Line 508: | ||
! width="20%" | Tier 9 ({{Tooltip|4,000|13,700 Points spent in total}}) |
! width="20%" | Tier 9 ({{Tooltip|4,000|13,700 Points spent in total}}) |
||
|- |
|- |
||
| − | ! colspan="5" style="background-color:hsla(200, 100%, 50%, 0.5)" align="center" | ''' |
+ | ! colspan="5" style="background-color:hsla(200, 100%, 50%, 0.5)" align="center" | '''Hacker''' |
|- style="background-color:hsla(200, 100%, 50%, 0.15)" align="center" valign="top" |
|- style="background-color:hsla(200, 100%, 50%, 0.15)" align="center" valign="top" |
||
| − | | [[File: |
+ | | [[File:Code Glitch.png|50px]]<br />'''Code Glitch'''<br />Unlocks and equips the [[Pocket ECM]].<br/>Changing to another perk deck will make the Pocket ECM Device unavailable again. The Pocket ECM Device replaces your current throwable, it can be switched out if desired. While in game you can use the throwable key to activate the Pocket ECM Device.<br/>Activating the Pocket ECM Device before the alarm is raised will trigger the jamming effect, disabling all electronics and pagers for a {{Color|value|6}} second duration.<br/>Activating the Pocket ECM Device after the alarm is raised will trigger the feedback effect, granting a chance to stun enemies on the map every second for a {{Color|value|6}} second duration.<br/>The Pocket ECM Device has {{Color|value|2}} charges with a {{Color|value|100}} second cooldown timer, but each kill you perform will shorten the cooldown timer by {{Color|value|6}} seconds.<br/>''{{color|negative|Note: Charges run on separate cooldowns. When both charges are used, the second charge will not run its cooldown or have it reduced by kills until the first charge's cooldown finishes.}}'' |
| − | | [[File: |
+ | | [[File:OpSec.png|50px]]<br />'''OpSec'''<br />Your maximum health is increased by {{Color|value|20%}}. |
| − | | [[File: |
+ | | [[File:Bit Decay.png|50px]]<br />'''Bit Decay'''<br />Killing an enemy while the feedback effect is active will regenerate {{Color|value|20}} health.<br>''{{color|negative|Unlisted effect: Increases dodge by 15%.}}'' |
| − | | [[File: |
+ | | [[File:Kluge.png|50px]]<br />'''Kluge'''<br />Killing at least {{Color|value|1}} enemy while the feedback or jamming effect is active will grant {{Color|value|20}} dodge of {{Color|value|30}} seconds. |
| − | | [[File: |
+ | | [[File:Botnet.png|50px]]<br />'''Botnet'''<br />Crew members killing enemies while the feedback effect is active will regenerate {{Color|value|10}} health.<br>''{{color|negative|Unlisted effect: Further increases dodge by another 15%.}}'' |
| − | |}</tabber></div> |
+ | |}</tabber></div> |
| − | |} |
+ | |} |
| + | |||
<references /> |
<references /> |
||
| Line 530: | Line 535: | ||
*The name of the perk deck and the '''Ambidexterity''' perk's function is likely to be a reference to the [[wikipedia:Hitman (video game series)|''Hitman'' video game series]], with the main character of the series, [[wikipedia:Agent 47|Agent 47]], known for being able to wield two weapons at once. |
*The name of the perk deck and the '''Ambidexterity''' perk's function is likely to be a reference to the [[wikipedia:Hitman (video game series)|''Hitman'' video game series]], with the main character of the series, [[wikipedia:Agent 47|Agent 47]], known for being able to wield two weapons at once. |
||
*The Ambidexterity perk was released prior to the [[Akimbo]] skill. If an akimbo weapon was in the inventory, it would claim that either the ''Ambidexterity Perk or the Akimbo Skill'' was required to unlock when the Hitman perk deck was not equipped, leading many to (correctly) speculate that a skill titled Akimbo would later be released. |
*The Ambidexterity perk was released prior to the [[Akimbo]] skill. If an akimbo weapon was in the inventory, it would claim that either the ''Ambidexterity Perk or the Akimbo Skill'' was required to unlock when the Hitman perk deck was not equipped, leading many to (correctly) speculate that a skill titled Akimbo would later be released. |
||
| + | *Despite its description saying your armor will recover after a short period in any situations, having your armor recovery supressed by a Turret wont trigger said effect. This is probably a bug. |
||
|-|Infiltrator= |
|-|Infiltrator= |
||
*The perk OVERDOG can be considered a melee counterpart to the Enforcer skill [[Underdog]], in that the perk conditionally raises the player's melee damage when surrounded instead of ranged. Unlike Underdog, however, OVERDOG's effects can stack. |
*The perk OVERDOG can be considered a melee counterpart to the Enforcer skill [[Underdog]], in that the perk conditionally raises the player's melee damage when surrounded instead of ranged. Unlike Underdog, however, OVERDOG's effects can stack. |
||
| Line 556: | Line 562: | ||
*The deck's effect of giving the player higher durablity and healing is possibly a reference to Tony's cocaine and rage fuelled last stand, where he was shot multiple times, though he shrugged his injuries off relatively quickly and continued to fight until he was disarmed, and even then he took a massive number of bullets to his torso before he was finally killed. |
*The deck's effect of giving the player higher durablity and healing is possibly a reference to Tony's cocaine and rage fuelled last stand, where he was shot multiple times, though he shrugged his injuries off relatively quickly and continued to fight until he was disarmed, and even then he took a massive number of bullets to his torso before he was finally killed. |
||
**It also functions quite similarly to the "Balls Meter/Rage Mode" in the 2006 game, ''{{w|Scarface: The World Is Yours}}''. When rage is activated, Tony will be immune from damage and heal himself with every kill. |
**It also functions quite similarly to the "Balls Meter/Rage Mode" in the 2006 game, ''{{w|Scarface: The World Is Yours}}''. When rage is activated, Tony will be immune from damage and heal himself with every kill. |
||
| + | |-|Hacker= |
||
| + | *All of the perks exclusive to this deck are, appropriately, named after terminology primarily used in computer science and security. |
||
| + | **A '''Code Glitch''' is simply an error caused by the code. |
||
| + | **'''{{w|Operations_security|OpSec}}''' (operational security) is an analytical process originally used by the US military for determining whether or not outside powers can observe your actions or information. |
||
| + | **'''{{w|Software_rot|Bit Decay}}''', also known as ''software rot'', is the deterioration over time of a program's performance and data integrity as new content is added to a program. |
||
| + | **A '''{{w|Kludge|Kluge}}''' in computer terminology is a sloppy, inefficient, or otherwise poorly designed fix or program that somehow works anyway. |
||
| + | **A '''{{w|Botnet|Botnet}}''', a combination of the word "robot" and "network", is a network of computers infected with malware from a single source. The source is able to direct them as a group to carry out various actions, i.e. to send spam messages or launch DDoS attacks. |
||
</tabber> |
</tabber> |
||
| Line 564: | Line 577: | ||
</gallery> |
</gallery> |
||
| − | {{ |
+ | {{Payday 2 skills}} |
[[Category:Gameplay (Payday 2)]] |
[[Category:Gameplay (Payday 2)]] |
||
[[Category:Skills]] |
[[Category:Skills]] |
||
Revision as of 17:15, 25 March 2020
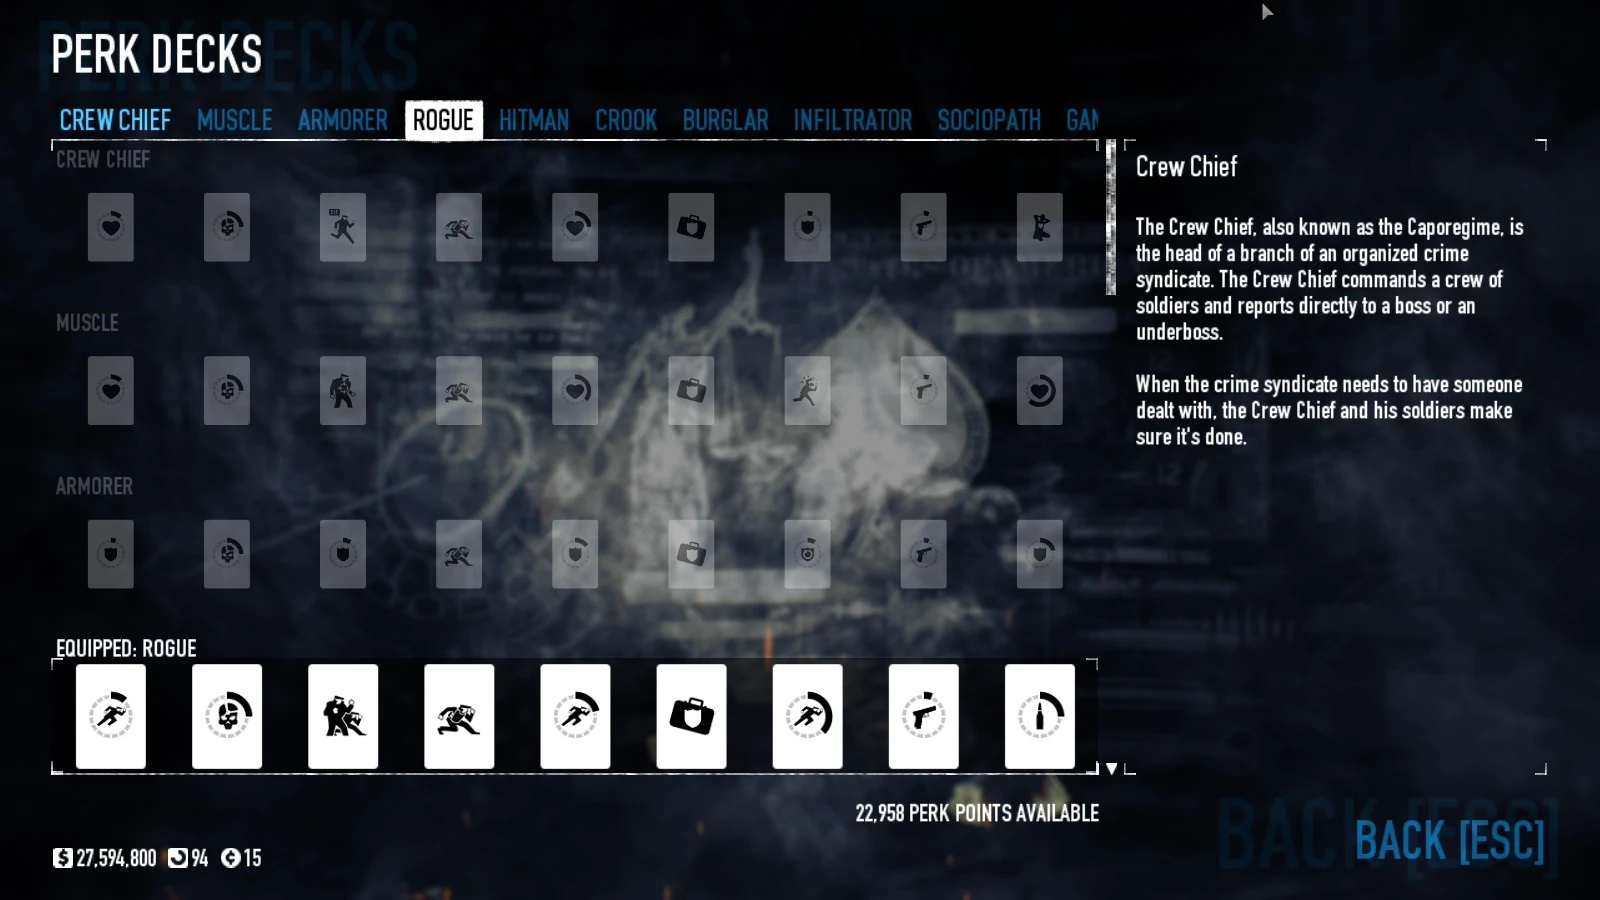

The Perk Deck selection screen.
The Perk Decks system was added on Day 5 of CrimeFest 2014, and formed one of the main parts of Update 39 along with an extensive rebalance of existing Skills.
Overview
Replacing passive tier bonuses, the Perk Decks system allows players to pick from twenty-one different "decks", each with nine perks (though the skills at second, fourth, sixth, and eighth rank are shared between all current decks). Only one perk deck can be active at a time.
Presently, Perk Decks are not reset when going Infamous.
Unlike skill trees which cannot be fully unlocked because of the limited number of skill points obtainable in-game, Perk trees rely on the player's XP income, converted into Perk Points, which is limitless, thus allowing one to eventually unlock/complete all twenty-one decks. This is offset by the fact that the player may only have one active perk deck at a time.
It costs a total of 13,700 Perk Points to fully unlock all 9 cards in a single deck, and 287,700 Points to unlock all 21 decks.
Gaining perk points is simple - after earning XP, go to the Skills & Perks screen and view the Perks Deck tab (selected in the upper left). If you have earned any experience since you last checked the Perk Decks tab, the game will then 'convert' that XP into perk points at a given ratio, which mostly depends upon current player level - as a benchline, round your level up to the nearest 10, then multiply by 10. For instance, at level 45 (rounding up to 50), the conversion ratio will be 500:1.
The conversion ratio is set by the level you were at after the skill points were added to your total, e.g. if you were level 60 (600:1 ratio) when you began a heist, but the experience gained raised you to level 61 (700:1), then the ratio for level 61 would be applied. If you should forget to convert points in between heists, the conversion calculation will apply the level you are at when you do process your perk points, even if the final heist of the series raised you to a higher conversion ratio. For example, if you had not converted points for three consecutive heists and only the final heist had raised your level to 61 (where the 700:1 ratio begins), the 700:1 ratio would still be applied to all the skill points being processed. This means it is to the player's advantage to process this conversion after every heist, just to ensure that no loss of perk points results from applying a higher conversion ratio than necessary.
The experience converted into perk points is not deducted from your overall level progress.
In addition, experience points earned past the level cap of 100 can also be converted into perk points - just visit the Perk Decks tab as you would normally.
- Note: If a player goes Infamous with un-exchanged perk points, but has yet to gain a level, the 1000:1 XP-to-perk-point ratio of the previous tier's reputation 100 still applies.
After you've earned perk points, you can now spend them on your perk decks. This is as simple as using the + (plus) button under the perk you wish to unlock. As long as a perk has not been fully unlocked, you can withdraw the points at any time by using the - (minus) button under the perk, but once a perk has been fully unlocked you can never get the points back.
Perks are on a simple line progression -- to be able to purchase the second tier perk you must first own the first tier perk, and so on.
Do note that although all perk trees has several common perk tiers, they are not shared among each other, meaning that, for example, unlocking the Crew Chief deck's Walk-In Closet perk will still cost an additional 1,600 perk points to unlock it again if one were to switch to a less-invested tree.Available Perk Decks
There are twenty-one decks in the game, with each one made up of four mutual perks, and five unique ones.
Mutual Perks
These are the perks found on each and every perk deck. The number in parentheses (e.g. (200)) beneath the tier number indicates how many perk points must be spent on that tier's skill to unlock it.
| Perk Decks | ||||
|---|---|---|---|---|
| Tier 2 (300) | Tier 4 (600) | Tier 6 (1,600) | Tier 8 (3,200) | Tier 9 (4,000) |
 Helmet Popping[1] Increases your headshot damage by 25%. |
 Blending In You gain +1 increased concealment. When wearing armor, your movement speed is 15% less affected. You gain 45% more experience when you complete days and jobs. |
 Walk-in Closet Unlocks an armor bag equipment for you to use. The armor bag can be used to change your armor during a heist. Increases your ammo pickup to 135% of the normal rate. |
 Fast and Furious You deal 5% more damage. Does not apply to melee damage, throwables, grenade launchers, crossbows, and the HRL-7 Rocket Launcher. Increases your doctor bag interaction speed by 20%. |
Deck Completion Bonus Your chance of getting a higher quality item during a PAYDAY is increased by 10%. This is given in addition to a perk deck's unique final perk. |
- ↑ Helmet Popping stacks multiplicatively; e.g. only 32 base damage is required to kill an FBI Heavy Response Unit, who has 240 health, because 32 × 6 (headshot multiplier) × 1.25 (Helmet Popping) = 240 damage.
Unique Perks
The table below shows a comparison between the values that differ per tree. The number in parentheses (e.g. (200)) beneath the tier number indicates how many perk points must be spent on that tier's skill to unlock it.
| Perk Decks | |||||||||||||||||||||||||||||||||||||||||||||||||||||||||||||||||||||||||||||||||||||||||||||||||||||||||||||||||||||||||||||||||||||||||||||||||||||||||||||||||||||||||||||||||||||||||||||||||||||||||||||||||||||||||||||||||||||||||||||||||||||||||||||||||||||||||||||||||||||||||||||||||||||||||||||||||||||||||||
|---|---|---|---|---|---|---|---|---|---|---|---|---|---|---|---|---|---|---|---|---|---|---|---|---|---|---|---|---|---|---|---|---|---|---|---|---|---|---|---|---|---|---|---|---|---|---|---|---|---|---|---|---|---|---|---|---|---|---|---|---|---|---|---|---|---|---|---|---|---|---|---|---|---|---|---|---|---|---|---|---|---|---|---|---|---|---|---|---|---|---|---|---|---|---|---|---|---|---|---|---|---|---|---|---|---|---|---|---|---|---|---|---|---|---|---|---|---|---|---|---|---|---|---|---|---|---|---|---|---|---|---|---|---|---|---|---|---|---|---|---|---|---|---|---|---|---|---|---|---|---|---|---|---|---|---|---|---|---|---|---|---|---|---|---|---|---|---|---|---|---|---|---|---|---|---|---|---|---|---|---|---|---|---|---|---|---|---|---|---|---|---|---|---|---|---|---|---|---|---|---|---|---|---|---|---|---|---|---|---|---|---|---|---|---|---|---|---|---|---|---|---|---|---|---|---|---|---|---|---|---|---|---|---|---|---|---|---|---|---|---|---|---|---|---|---|---|---|---|---|---|---|---|---|---|---|---|---|---|---|---|---|---|---|---|---|---|---|---|---|---|---|---|---|---|---|---|---|---|---|---|---|---|---|---|---|---|---|---|---|---|---|---|---|---|---|---|---|---|---|---|---|---|---|---|---|---|---|---|---|---|---|---|---|---|---|
The Crook deck largely focuses on increasing Dodge chance for ballistic vests users, providing up to +40% dodge chance to early to mid tier armor. The final tier effect provides faster armor recovery. It should be noted that all armors (excluding the suit) have negative dodge values as their base, so this perk deck will not result in any positive chance for the player to dodge fire until several perk levels have been unlocked. The lower level the armor, the earlier this perk deck will overcome its negative base dodge stat to begin providing active assistance in dodging fire, and the higher the eventual dodge chance will be once all the dodge chance perks have been unlocked. For example, the standard Ballistic Vest has a base dodge rating of -25, so the player will see no active benefit from this perk deck until the fifth tier perk Advanced Composure has been unlocked, at which point the player will see an active dodge chance of 5% from the combined perks up to that point. This is irrespective of any boosts to dodge the player may be receiving from skills, however. As of Update #74, the Crook deck also grants up to 65% increased bonus armor when using any of the ballistic vest variants. This is enough to give the Heavy Ballistic Vest a significantly higher armor rating than the Combined Tactical Vest, as well as the Heavy Ballistic Vest having a higher dodge and speed rating.
Note: Medium range is classified as 18m or less.
Note: Medium range is classified as 18m or less.
The Ex-President deck was released with the Bodhi Character Pack. The deck focuses on armor and health restoration after killing enemies. It shares some similarities to the Grinder perk deck, albeit with some differences.
All HP obtained from killing is moved to a 'storage'. The HP from the storage can be reclaimed once the Ex-President loses all its armor, and then regenerates so. One can also claim the stored HP by using Bullseye, even if it's not the full armor. Any loss of health is restored equivalent to the amount stored.
Despite the wording, Unseen Shadow does not double the effects of Smoker.
| |||||||||||||||||||||||||||||||||||||||||||||||||||||||||||||||||||||||||||||||||||||||||||||||||||||||||||||||||||||||||||||||||||||||||||||||||||||||||||||||||||||||||||||||||||||||||||||||||||||||||||||||||||||||||||||||||||||||||||||||||||||||||||||||||||||||||||||||||||||||||||||||||||||||||||||||||||||||||||


Achievements and Trophies

|
Megalo-Mania Have all four players using a fully unlocked Maniac perkdeck and have an average of 65% or more of the white Maniac bar filled. |
")
- "Ernesto Sosa didn't like it when you destroyed his car. Or when you killed him."
- —Trophy description.
UNLOCK CONDITION:
Complete the Scarface Mansion job on the Mayhem difficulty or above in loud, with four players all using the Maniac perk deck and no skills. To complete this challenge, you have to have played the job from start to finish.
PLACEMENT:
Scarface's Room.
Trivia
- The Shadow Warrior perk refers to the video game of the same name and/or its 2013 reboot, while Killer Instinct refers to the video game series of the same name.
- Euphoria is the state of intense excitement and happiness felt when the concentration of the above four reaches a high enough level.
- Blitzkrieg Bop by Ramones.
- Straight Edge by Minor Threat.
- Death or Glory by The Clash.
- Rise Above by Black Flag.
- Lust for Life by Iggy Pop.
- Bad Guy Coming Through is from his speech in the restaurant scene after getting in an argument with Elvira Hancock.
- Play Rough is from his speech in the final scene.
- Right to the Top is from the scene where he proposes to Elvira Hancock.
- It also functions quite similarly to the "Balls Meter/Rage Mode" in the 2006 game, Scarface: The World Is Yours. When rage is activated, Tony will be immune from damage and heal himself with every kill.
- A Code Glitch is simply an error caused by the code.
- OpSec (operational security) is an analytical process originally used by the US military for determining whether or not outside powers can observe your actions or information.
- Bit Decay, also known as software rot, is the deterioration over time of a program's performance and data integrity as new content is added to a program.
- A Kluge in computer terminology is a sloppy, inefficient, or otherwise poorly designed fix or program that somehow works anyway.
- A Botnet, a combination of the word "robot" and "network", is a network of computers infected with malware from a single source. The source is able to direct them as a group to carry out various actions, i.e. to send spam messages or launch DDoS attacks.
Gallery
")
")
")
")
")
")
")
")
")
")
")
")
")
")
")
")
")
")
")
")
")
")
")
")
")